Friday, January 29, 2010

Koftay

Koftas are seasoned mince meat shaped into small balls that taste equally good cooked,baked,fried or grilled.What I love about Koftas is that they are very versatile and can be made in many different ways by using a little bit of creativity and imagination. 

Using your imagination and creativity to prepare a wonderful meal using koftas is a breeze if you have koftas ready to be used instead of starting from the scratch.I am not against the ready made koftas available in the market but personally prefer homemade koftas which can be prepared in advance,kept frozen to use whenever you need them and definitely a zillion times better than the store bought ones.

Today I am posting the recipe of making and freezing koftas my way to enjoy a hassle free meal later (using them )with out compromising the taste.

What you need:
  • Minced Meat : 1 Kg
  • Raw Papaya paste : 1 Tbsp 
  • GG paste : 1 tbsp
  • Salt : 1 tsp ( up to taste)
  • Red Chili : 1 Tsp ( up to your tolerance level)
  • Turmeric : 1/4 tsp
  • Coriander Powder : 1 tsp
  • Cumin Powder : 1/2 tsp
  • Garam Masala Powder : 1/2 tsp

koftay

How to :
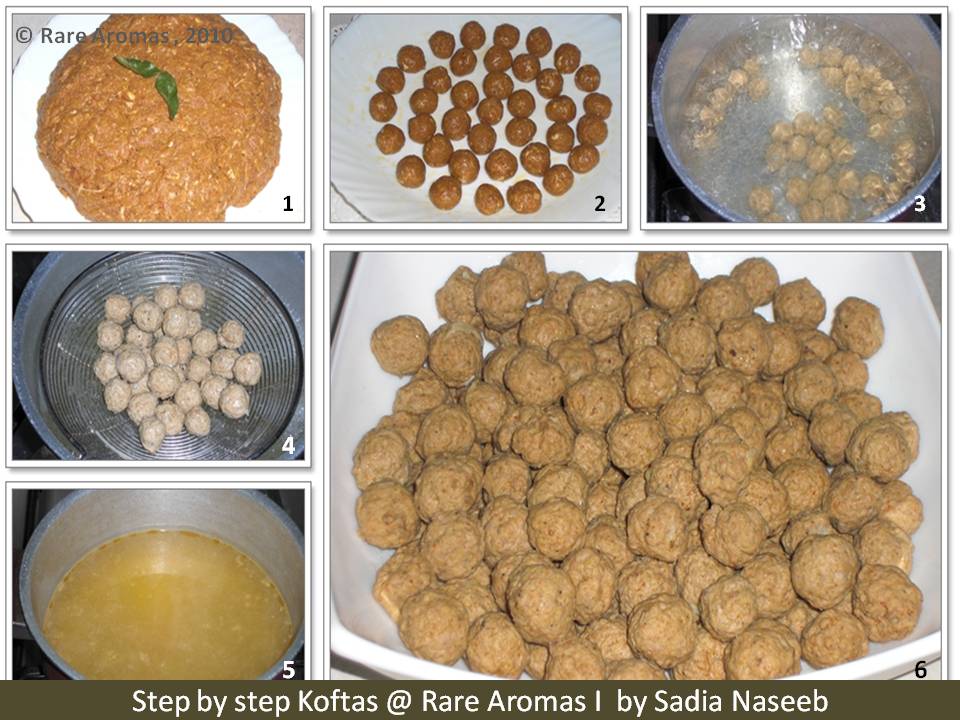
  1. Add all the ingredients listed above into the minced meat and mix well.Let rest for an hour. ( pic - 1 )
  2. After an hour make balls out of the minced meat.( pic - 2 )
  3. Boil water in a pan and drop the balls gently into the pan and let boil briskly for about 2 - 3 minutes. ( pic - 3 )
  4. Fish out the balls out of the water and keep aside. ( pic - 4 ).Repeat until all balls are boiled.
  5. Reserve the water ( in which the balls have been boiled) . ( pic - 5 )
  6. Your koftas are ready to be frozen. ( pic - 6 )
  7. To freeze put the balls in a plastic container along with some of the reserved boiled water ,cover and keep in the freezer.To use simply defrost or heat through in a microwave and the koftas are ready to be used.
Notes:
  • Omit papaya if you do not have it , though I totally recommend it for softer koftas.
  • The boiled meatballs can be fried before using (after defrosting) if you prefer.
  • The size of the balls depends on you. For using koftas in pulao and biryani I make smaller balls ( as in pic – 6 ) and for karahi and curry the standard size is the best.
  • The water ( in which the koftas have been boiled) is excellent to make gravy because of the flavors it has absorbed from the koftas.
Continue Reading >>

Saturday, January 23, 2010

Desi Tomato Sauce

Our local newspaper once did a people - on - the - street  interview of favourite kitchen aromas,and tomato sauce ranked three among the top choices and I couldn't agree more.

Bottled sauce doesn’t fill the air with molecules of savoury stewing or its smell doesn’t signal that a satisfying meal is coming … Only homemade sauce can do this and even the best brands can’t compare in terms of taste.

The recipe I am posting today is so easy that even kitchen novices can cook it.It is a bit different than the normal tomato sauce because it has been tempered with desi masalas .. which I personally believe make the plain bland sauce more flavourful, intense and interesting.

Tomato sauce -1

What you need :
  • Tomatoes : 1.5 kg ( chopped )
  • curry leaf : 5 – 6
  • Whole cumin ( sabot Zeera ): 1 tbsp
  • Mustard Seeds ( rai ) : 1 tbsp
  • Garlic : 6 -  7 bulbs
  • Whole red chili : 6 - 7 ( up to your tolerance level )
  • Salt : 1 tbsp ( up to taste )
  • Turmeric : 1/2 tsp
  • Coriander Pwd : 1 tbsp
  • Tamarind Pulp : 2 Tbsp ( up to taste)
  • Green Chili : 5 -  6 ( chopped finely – up to taste) 
  • Red food colour :  1 -2 drops ( optional )
  • Oil : 1/2 cup

Tomato sauce page

How  To :
  1. Heat oil in a pan. Add Curry leaves and let sizzle for a minute or two.( pic - 2 )
  2. Add in Mustard seeds and Whole cumin ( pic - 3 ) , after a minute throw in the garlic ( pic - 4 ) and let sizzle for a minute.
  3. Add in the chopped tomatoes (pic - 1 ), whole red chilies , salt, turmeric and coriander powder. ( pic - 5 )
  4. Crank up the heat and let it simmer for about 40 - 45 minutes ( pic - 6 ) or till it reduces to almost one third.
  5. Puree the cooked sauce in a blender or with hand blender ( pic – 7 ) , add chopped green chilies ( pic - 8 ) and simmer on gentle heat till the sauce oozes out the oil.( pic - 9 )
  6. Adjust seasoning .
  7. Desi Tomato Sauce is ready to be served !

Notes :
  • You will get around 2 - 2.5 cups of sauce out of 1.5 kg tomatoes.
  • The boiling time of the sauce depends on the quality of pan and heat so cook accordingly.
  • Keep stirring in between to avoid sticking or burning.
  • Do not puree the sauce if you like the chunkier taste.
  • This Sauce is multi – purpose and very versatile. You can use it for making pasta, as a sandwich filling , as a dip with French bread or crackers , as chatni with plain rice , khichri or even pulao, as pizza sauce , spread on toast , sprinkle some cheese and bake for a quick pizza, use it in karahi gravies to add flavor .Use your creativity to make more interesting combinations because the possibilities with this sauce are endless.

Tomato Sauce
Continue Reading >>

Tuesday, January 19, 2010

Muqaish Daal

I am a meat lover by default and because of this I am not much of a daal person but when it comes to Muqaish Daal … I just cant resist it.Its simply that wicked !!

One of my friend asked me about the name .No,it has nothing to do with music. Muqaish (a.k.a  Kamdani) is a kind of embroidery where shiny silver flat metal strip is used to place stipples or dots on varying distance resembling the effect of twinkling stars in the sky. Since this daal is cooked in a way that you end up with pearly white separate grains like stipples…hence the name “ Muqaish Daal ”.
This daal is another express meal … ready in thirty minutes flat from start to finish.Did I mention this daal is so tasty that even the hard core meat lovers ( like me ) wont be able to pass it.

Muquaish daal

What you need :
  • Urad ( Mash) daal : 1 cup (washed and soaked in water for an hour)
  • Water : 1/2 cup
  • Milk : 1/2 cup
  • Salt : 1 tsp ( up to taste )
  • Clove : 2
  • Black cardamom : 1
  • Whole black pepper : 5
  • Cinnamon : 2 small pieces
Tempering ( tadka or baghar ) :
  • Onion : 1 medium ( sliced finely )
  • Whole red chili : 5 - 6
  • Ginger : 2 inch piece ( cut into fine stripes)
  • garlic : 5 - 8 bulbs ( sliced finely )
  • Whole cumin : 1 tsp
  • Green coriander :  3 tbsp ( finely chopped )
  • Oil : 1/2 cup
How to :
  1. Drain the soaked daal.
  2. Mix water,milk and salt. Add in the whole Gram masala.
  3. In a non stick pan … add daal and the milk + water mixture.
  4. Let boil once on high heat and then cover the pan and let cook on medium to gentle heat till the liquid dries up and the daal is tender but not mushy.
  5. Heat oil in another pan. Put sliced onions and whole red chilies and let sizzle for 2 minutes . When the onions begin to get soft and kind of transparent add Green Coriander,Ginger and Garlic.
  6. When you see the onions are about to be golden brown add Whole cumin and let sizzle for a minute.
  7. Pour the Tadka ( along with oil ) onto the cooked daal.
  8. Let cook for two minutes to infuse the tadka .
  9. Muqaish Daal is ready .
  10. Serve with Nan or roti .

page-2

    Notes :
    • You can use also only water ( instead of half water and half milk) for boiling the daal.
    • The water ratio depends on the quantity of daal. Both should be equal. 1 cup daal =1 cup water,2 cups daal = 2 cups water etc.
    • In the end the daal should be thoroughly cooked and tender but not mushy and each grain should be separate ( it wont be Muqaish daal otherwise ). This depends on the pan and the quality of heat so you have to workout on that.
    • There will be a white scum on top while boiling , its normal just leave it like that.It will vanish by the end.
    • A dab of butter on top of daal while serving will make it more delicious.

    Daal plate
    Continue Reading >>

    Saturday, January 16, 2010

    Chatpatay Aloo

    If Mango is the king of fruits then to me potato is the king of vegetables.Potato is undoubtedly the most loved vegetable on earth.The reason is its versatility.The humble potato can be cooked into countless yumlicious dishes.Fried,boiled,roasted,baked,creamed,buttered or mashed ..it always tingle your taste buds.Despite being delicious Potato is an excellent source of carbohydrates, the body's best energy source.Potato is fat free, cholesterol free, sodium free and saturated fat free. It is high in Vitamin C and potassium and is a great source of Vitamin B6 and dietary fiber.Tasty and full of important nutrients …. no wonder Potato is the darling of all !!

    The chatpatay Aloo I am posting today are not only tasty but also hassle free .Don’t you just love when all you have to do is throw all the ingredients in the pot,cover let cook for about 30 minutes and voila ! dinner is ready … chatpatay Aloo is that type of dish.. In my home we usually eat this with pori or parathas in breakfast or just plain as chat but it tastes equally good with roti or Naan as well.


    chatpatay Aloo

     What you need :
    • Potatoes : 250 gms ( peeled and sliced uniformly)
    • Onion : 1 medium ( finally chopped)
    • Tomato : 1 medium ( chopped )
    • Green chili : 3 -  4 ( finely chopped – up to your tolerance level)
    • Turmeric : 1/4 tsp
    • Salt : 3/4 to 1 tsp ( up to taste)
    • Tamarind pulp : 1 tbsp
    • Curry leaf : 3 – 4
    • oil : 1/2 cup

    How to :
    1. Heat oil in a non stick pan … add curry leaf and let sizzle for a minute.
    2. Throw in all the ingredients ( potatoes.tomato,onion,chili,turmeric,salt and tamarind pulp).stir to mix well.
    3. Cover the pan and let cook  for about 25 to 30 minutes on gentle heat till the potatoes are done.
    4. Adjust seasoning .
    5. Chatpatay Aloo are ready to serve .

    Notes :
    • You can use juice of one lemon instead of tamarind pulp.Use tamarind or lemon juice as per your taste.
    • Omit curry leaf if you don’t have any at hand .
    • Do not add any water because potatoes will be done in the water released by tomato and onion.
    • These aloo make excellent sandwich filling . 
    • For Bahraini  readers ..since the tamarind is ready salted here .. Go easy on salt .. check the seasoning after adding the Imli Pulp to avoid saltiness.
    chatpatay Aloo

      Continue Reading >>

      Tuesday, January 12, 2010

      Achari Gobhi

      I personally believe that achar  ( pickle ) can perk up any bland dish and for that reason it is a staple food in almost every household.Nothing can beat the combo of a ladle or two of daal on a hot steamy plate of rice with achar , and simple tomato onion salad …ahh pure bliss !!

      There are several varieties of achar available but that was not enough for the achar lovers like me so they mix and match recipes using achari masala to satisfy their ‘ achari tooth “.

      Achari gobhi is one of the many ways you can use achari Masala to get the familiar achari taste.All I can say about achari gobhi is that it is not only supper yummy but supper easy and fast to cook dish that is a regular in our home. 


      What you need :
      • Phol Gobhi ( cauliflower ) : 1 kg ( cut into medium size florets)
      • Achari Masala : 1 tbsp
      • salt : 1 tsp ( up to taste)
      • Red chili : 1 tsp ( up to your tolerance level )
      • Turmeric : 1/4 tsp 
      • Lemon juice : 2 tbsp (  juice of one lemon is enough )
      • Oil : 1/2 cup
      • Water : 1 glass

      Achari Masala :
      • kalounji ( carway seed) : 1/2 tsp
      • Sabout zeera ( whole cumin ) : 1/2 tsp
      • Saunf (Aniseed) : 1/2 tsp
      • Rai ( Mustard seed ) : 1/2 tsp
      • Meethi dana ( Fenugreek whole) : 1/2 tsp

      Mix all the above listed whole masals.  It will make around a tablespoon or so . This is the standard masala used for pickling in Pakistan.


      Achari Ghobhi


      How To :
      1. Heat oil in a wide bottom pan .
      2. Add the Achari masala ( pic – 1 ) and let it sizzle for a minute. You will definitely smell the familiar achari aroma at this point. ( pic – 2 )
      3. Throw in the Phol gobhi and sauté for a minute. ( pic – 3 )
      4. Add in the salt ,chili and turmeric powders and continue sautéing for another minute coating the gobhi well with the masala. ( pic – 4 )
      5. Pour in the glass of water and lemon juice, stir once lightly and then cover and cook on medium heat till the water dries up and you end up with tender  achari masala coated gobhi florets. ( pic - 5 )
      6. Achari Gobhi is ready ( pic – 6 ) . Serve with buttered roti or naan.

        Notes :
        • Since there is just salt and chili as masala .. keep checking the seasoning and adjust it accordingly to avoid a bland outcome.
        • A glass of water is enough for cooked through gobhi ..but that also depends on the heat and pan you are using so work out that to avoid mushy gobhi.
        • Do not stir the gobhi after adding water because doing so will break the florets and in that case you may end with achari qeema :)
        • Go easy on Meethi Dana ..sometime it turns bitter.To avoid this instead of 1/2 tsp take 1/4 tsp of Meethi Dana.

        Achari Ghobhi
        Continue Reading >>

        Thursday, January 7, 2010

        Everyday Chicken

        Its hard to confess but the truth is that I have been bitten by the “Blogging Bug” for sure. A few months back my shopping interest was all girlish bags ,shoes , make up ,perfumes and stuff but the day I  entered into the blogging world that has changed. To my surprise ( and the rest  ) now my shopping mainly consists of  what I say  “blog appropriate” crockery .

        My friends are so fed up with this that they even wont let me go to the crockery section if they are with me but I cant help to sneak :).This craze of mine is so obvious that recently I went shopping with my Abbo Jee and to my surprise he came to me with a bowl which was on display and he thought I might like it for my Blog appropriate crockery collection.I really liked the lovely black bowl and he bought it for me. 

        For the “official inauguration” of the black bowl I cooked simple everyday Chicken curry ( my abbo jee’s fav ) which i am sharing with you.

        What you Need:
        • Chicken : 12oo gms ( cut into curry pieces)
        • Onions : 2 medium ( Sliced finely )
        • Tomatoes : 2 medium ( chopped finely )
        • Yogurt : 1/2 cup
        • GG paste : 1 tbsp
        • Salt : 1 tsp ( up to taste )
        • Red chili : 1 tsp ( up to your tolerance level )
        • Turmeric : 1/4 tsp
        • Coriander powder : 1 tsp
        • Cumin powder : 1/2 tsp
        • Garam Masala Powder : 1/2 tsp
        • Fresh green chili : 2 – 3
        • Oil : 1/2 cup
        • Hot water : 3 glasses ( depends how much gravy or shorva you prefer)
        How to :
        1. Mix in the salt,chili,coriander,turmeric,cumin and garam masala powder into to the yogurt , mix well and keep aside.
        2. Heat oil and fry chicken pieces till they are light brown .Take out the chicken and keep aside.
        3. In the same oil fry sliced onions till golden brown. Add GG paste and sauté for a minute.
        4. Throw in the chopped tomatoes ,sauté till they become mushy .
        5. Now put the yogurt  + masala mix and the onion tomato mixture from the pan in a blender and blend  into a smooth paste . Return to the pan and continue cook on medium flame till it is no longer raw and you can see the oil floating .
        6. Now its fried chicken’s turn to join the rest in the pan.Sauté chicken along the masala paste till the chicken is thoroughly cooked . At this stage you should have nicely brown chicken with clingy masala paste.
        7. Add in 3 glasses of hot water and fresh green chili  , let it boil on high heat once and then reduce flame, cover and let it simmer gently for about 2o minutes.
        8. Everyday chicken is ready .. serve.
        Notes:
        • Add a teaspoon of vinegar to a pan full of water and keep cut chicken in it for 20 minutes to get rid of the raw chicken smell.Throw the water and wash chicken before use.
        • This is the basic chicken shorva curry .You can build many combinations from it. Add vegetables like potato, okra,lauki , cauliflower with water if you do not want plain chicken shorva or you can add spinach ,fenugreek to make palak chicken etc.
        • Always use hot water for the gravy or shorva instead of cold water for a smooth gravy.

        everyday chicken
        Continue Reading >>

        Monday, January 4, 2010

        Aloo Maythi

        Come winter and once a month the weekend activities change  into this at Naseeb’s household..
        1. Visit to the local Central Market early in the morning.
        2. Coming home with bundles and bags full of all kind of greens found on earth. ( spinach , Fresh fenugreek , Mustard greens etc.)
        3. Picking , weeding and cleaning the greens bought .
        4. Cutting the greens .
        5. Boiling , and freezing the cut greens .
        Since we are only three people ( me , mom and dad ) ..cutting greens is a family affair …
        My Abbo jee picks the greens after weeding .. makes little bundles of them … My mom and I cut them the finest possible .. then the greens go into the washing session … (the longest and the most tiresome stage ) till they are absolutely dirt and sand free… in the end comes the boiling and freezing part done by yours truly.This whole process takes almost a day ( depends how much greens you have bought ) .. but it gives you many hassle free cooking days later where you can “ mix and match ” the greens with your choice of vegetable,meat or daal .

        Sounds easy .. not really if you have quality controller like my mom .I better not say any thing further .. hope you can imagine the rest :)

        Here is the first green encounter of this winter .

         What you need :
        • Aloo ( potatoes ) : 500 gms ( peeled and quartered )
        • Maythi ( fenugreek leaves ) : 250 gms ( boiled )
        • Onions : 2 medium ( chopped finely )
        • Tomatoes : 2 medium ( chopped finely )
        • GG paste : 1 tbsp
        • salt : 1 tsp ( up to taste )
        • Red chili : 1 tsp ( up to your tolerance level )
        • Turmeric : 1/4 tsp
        • Oil : 1/2 cup

        aloo meethi -pg

        How to :
        1. Heat oil and sauté onions till light brown. ( pic – 2 )
        2. Add in the dry masala and GG paste . ( pic - 3 )
        3. After sautéing for about two minutes .. throw in chopped tomatoes. (  pic – 4 ) and cook till you get a smooth masala paste .( pic – 5 )
        4. Add Maythi and cook for about five minutes. ( pic – 6 )
        5. Lastly add in Potatoes  ( pic – 7)  . Stir , cover and let cook on medium flame till potatoes get tender and oil floats on top. ( pic – 8 )
        6. Aloo Maythi is ready . Serve with chapatti or Parathas and raita.

        Aloo Meethi

        Notes :

        • If you want to use  fresh maythi ..the quantity should be 1 kg ... as maythi shrinks a lot after boiling and one kg will aprox. make 250 gms ( more or less ) of boiled maythi.
        • Defrost the frozem maythi on counter Top for about 2 hours or use the defrost option in the microwave.
        • Aloo Maythi makes an excellent breakfast with fresh Parathas or poories .
        Continue Reading >>
        Related Posts with Thumbnails
         

        designer : anniebluesky ( Modified by | Sadia Naseeb ): www.bloggeruniversity.blogspot.com