Thursday, December 17, 2009

No Fuss Biryani

I have yet to meet someone who dislikes biryani .It is by far the most famous and  loved one pot wonder of layered meat,spices and rice.I usually hesitate making biryani because to me its seems too big of a project that needs patience , time and off course expertise. Me being Hyderabadi from maternal side , have no idea to make biryani that takes less then 2 days from start to finish ( this includes marinating the meat a day ahead and the next day cooking qourma , boiling rice , layering , garnishing  and finally giving the dum ). I will confess though that all this hard work seems to pay off the moment I open the dum and the house fills with the insanely delicious aroma of  biryani … not to mention the praising and applaud from the loved ones and the satisfaction that comes along the task being well done makes it worth all the efforts.
Last Friday , my friends gathered to have a one dish party and decided to make biryani . I was kind of wondering how on earth we can make biryani in one day from scratch . We all got together as planned and started making biryani. It took us almost 3 hours from start to finish and to my surprise the end result was a yumlicious biryani, though not the usual taste of a hyderabadi biryani but honestly it tasted really wicked with salad , raita , ice cold Pepsi ..and the company of good friends.
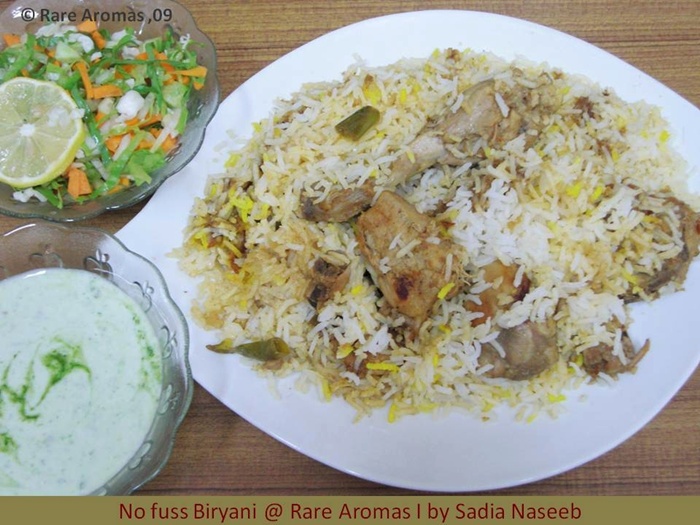
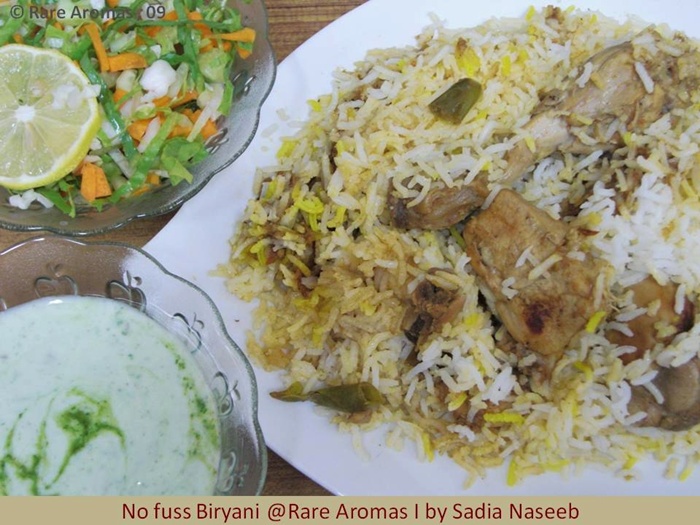
I am posting the recipe here rightly naming it no fuss biryani :)

Bb

What you need :

For the rice :
  • Rice : One Kg ( washed and soaked for an hour )
  • oil : 2 Tb spoon
  • Salt : 3 Tb spoon ( up to taste )
  • Whole Garam Masala: 1 Tb spoon
  • Vinegar : 1 Tb spoon
For the meat Qourma ( gravy ):
  • Chicken : 2 kg
  • Onions : 5 Medium ( chopped finely)
  • Tomatoes : 5 medium ( chopped Finely)
  • Green chili : 3 –5 ( chopped finely )
  • GG paste : 1 Tb spoon
  • National Biryani Masala : 1 packet
  • salt : 1 tspoon  ( up to taste)
  • Red chili powder : 1 tspoon ( up to your tolerance level)
  • Coriander Powder : 1 tspoon
  • oil : 1 cup

biryani

How to do it :

For the rice :
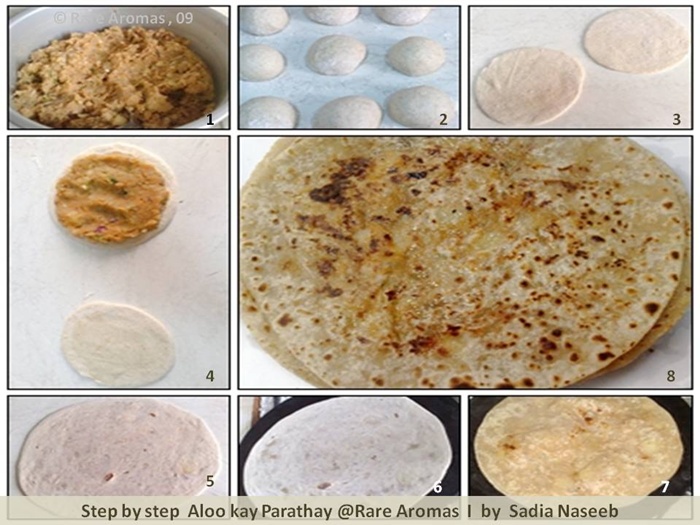
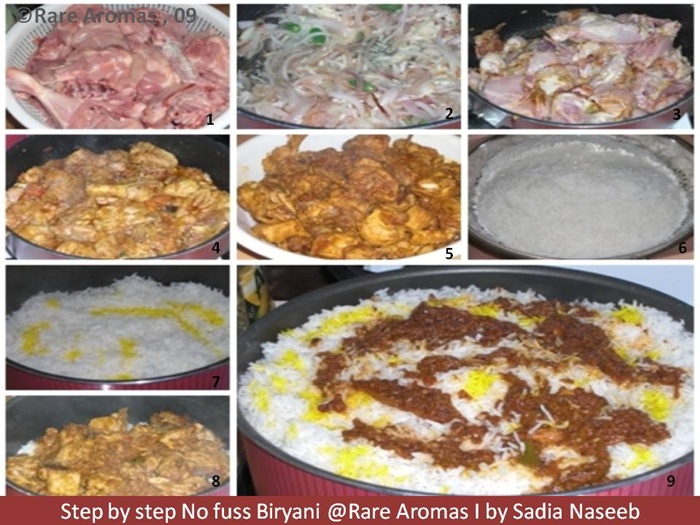
  1. Boil rice with all the ingredients till three fourth done. Drain and keep aside. ( pic -  6 )
For the qourma :
  1. Wash chicken , keep in strainer to let the water drip. ( pic - 1 )
  2. Heat oil .. add in onions and green chilies and fry till onions are light brown. ( pic - 2 )
  3. Add in the GG paste. cook for a minute.
  4. Throw in the chicken and cook till its no longer raw and turns white. ( pic - 3 )
  5. Add in all the masalas ( National biryani masala , salt ,chili and coriander powder).Cook for almost 5 – 10 minutes . ( pic - 4 )
  6. Toss in  chopped tomatoes and continue cooking till all the water dries up and you end up with thoroughly cooked chicken and a clingy gravy. ( pic – 5 )
  7. Layer half of the rice at the bottom of the pan , sprinkle in the food colour ( pic - 7 )
  8. Spoon in  all the chicken gravy and spread out evenly . ( pic - 8 )
  9. Finish off with another layer of rice .. topping with food colour and remaining masala if any . ( pic - 9 )
  10. Put the lid tightly and put on dum on the stove for about 30 – 35 minutes.
  11. Gently mix in the rice and meat .. serve with salad and raita.
Notes :
  • Adding vinegar while boiling rice will result in more whiter rice.
  • Adding oil prevents the rice from sticking together .
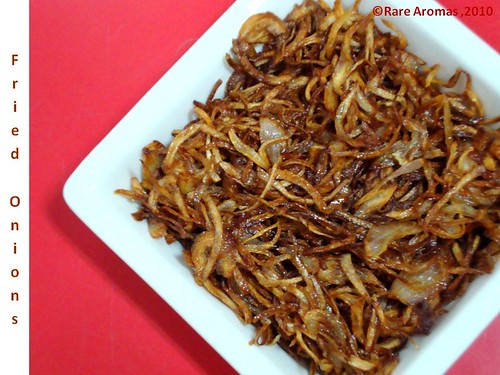
  • Since its a no fuss biryani , we didn’t bother about the garnish much , but for more aromatic biryani add fried onions, green coriander and mint in between the layers and in the end along with the food colour.
  • Follow the same recipe for mutton biryani but keep in mind that the gravy will take longer to cook .

B
Continue Reading >>

Monday, December 14, 2009

Light Masala Okra

Bright green okra, pronounced OH-kruh, also known as Lady’s finger is a slender, ridged and tapered pod.It comes in varying shades of green, (there is also a new red variety).
Okra is a good source of dietary fiber, and is fat-free.It also provides a good source of vitamin C, vitamin A and B plus contains magnesium, potassium and calcium.  Okra is slimy ,slippery and sticky - it is supposed to be that way. okra fans  like me especially love this vegetable's slippery culinary personality.
Here is one of the countless tasty ways of  preparing okra which is a favourite in my home.

okra -1

What you need:
  • Okra : 500 gms
  • Onion : 2 small or 1 big ( finely chopped )
  • Tomato: 1 ( big  - finely chopped)
  • Green chili : 5 ( the big sweet ones – cut into 1 inch pieces)
  • GG paste : 1 tablespoon
  • Salt : 1/2 tea spoon ( or up to taste)
  • Red chili : 1/2 tea spoon ( or up to taste)
  • Turmeric ( haldi ): 3/4 teaspoon
  • Oil : 1/2 cup
How to do it :
  1. Wash and cut okra into 1 inch pieces.
  2. Heat oil in a pan .Add in chopped onions and cook till they are light golden brown .
  3. Add GG paste, salt , chili and turmeric.
  4. Stir for a minute and then add in the chopped tomato.cook till tomato gets soft and oil starts to ooze out.
  5. Now add okra and green chili , stir for a minute … cover the pan , lower the flame and cook on gentle heat till okra is no longer raw (for about 20 minutes or so ..depends on your pan and stove so keep checking in between because over cooked okra does not look or taste good  )
  6. Light Masala Okra is ready … Serve with Lightly buttered roti,naan or paratha.
Notes :
  • Most people do not eat okra because of its sliminess .. To address that I cut okra into desired pieces and keep it in the fridge (covered by cling film) 24 hours before cooking.Doing so greatly reduces the sliminess of okra.
  • If you can not find long green chilies … then use 2 –3 capsicums instead.
  • Okra is usually available year round with a peak season during the summer months but it can be kept frozen for up to 12 months.I do my grocery shopping every fortnight .. and sometimes cut Okra into medium size pieces and freeze it in zip – lock bag to use later ( if I am not planning to use it right away).To use I defrost Okra on counter top for about two hours.Freezing okra also reduces the sliminess . 

okra -1
Continue Reading >>

Wednesday, December 9, 2009

Aloo Kay Parathay

I live in Bahrain which is a small island in Arabian gulf , famous for its almost killing summer and scorching heat among other things . Rain is something that people of Bahrain are not so lucky to have.Last year went dry without a single drop of rain , but this year we are fortunate enough to have this blessing . The whole past week weather was pleasantly cold with occasional drizzling ... the pitter patter of  rain drops and the cold breeze was enough excuse for the heat struck people to come out and celebrate this lovely weather.
Instead of going out One of my friend arranged a get together at her place to enjoy the weather the desi style by making Aloo kay parathay,watching movies and listening music. when friends are together , nothing matters more than their company , but what makes this even more fun and exciting is to cook something together from scratch and then have it when everybody is dead tired .. The aloo kay parathay i am posting  today are the result of the combined efforts of  my friend Jamila , Arooj and off course yours truly .we had a lot of fun making these ( and eating too :)  ..
Here is a suggestion for all of you guys …. call your friends , and try cooking something together. I am more than hopeful that you will also enjoy  as much as we did.. 

What you will need :
  • Dough  : 500 gms ( take equal amounts of all purpose flour and regular chapatti dough.Mix in half teaspoon of salt and enough water till it resembles like crumbs. knead this to get a smooth dough ball )
  • Potato Stuffing : 1 kg ( boil potatoes , peel and mash . Mix in the spices (salt,red chili ,coriander powder )  , 1/2 cup finely chopped onions , 2 tablespoon finely chopped fresh coriander , 1 tsp finely chopped green chilies , juice of one lemon ) 
  • oil : 1 cup ( for frying )                         

step by step parathas

How you will do it :
  1. Make tennis size balls out of the dough . ( pic –2 )
  2. Roll out two small dough balls to about 3" diameter Chapatti. ( pic – 3 )
  3. Evenly spread about 2  - 3 Tablespoons of filling on one chapatti  leaving about ¼" space around the outer edge.( pic – 4 )
  4. Put the first Chapatti on top of the filling.  Press the center to let air out. Then press the left out areas to seal the filling.
  5. With a rolling pin roll out Paratha to about 6" to 7" diameter. This helps the filling to actually stick to the dough.( pic –5 )
  6. Heat the griddle (Tawa).
  7. Cook the rolled out Paratha over griddle for about 45 seconds to 1 minute. Lift the corner of the Paratha with Turner ( chimta ). The underside should have a few brown spots.( pic – 6 )
  8. Turn it over and cook another 45 seconds to 1 minute. Baste the top (cooked surface) with oil . ( pic – 7 )
  9. Turn it over, cook the basted surface another 45 seconds to 1 minute. Baste the top (cooked surface) with oil . 
  10. Repeat the same process with the rest of the dough balls.
  11. Aloo kay parathas are ready ( pic – 8 ) . Serve with dips of your choice and enjoy .
Notes :
  • Heating tawa is very important for making good parathas.If it is under heated , the dough will stick to it and in case of over heated tawa the dough will burnt without being cooked thoroughly .To avoid this I usually put a test bread on the Tawa. If the bread sticks to griddle, you need to increase heat. If the bread gets brown spots too quick, it is too hot. It should develop brown spots on the underside in about 30 - 40 seconds.
  • You can use any stuffing you like ( minced meat , vegetables , daal or even leftover curries ).
  • A glass of cold drink or lassi will make the parathas more tastier.

Alloy Kay parathay
Continue Reading >>

Wednesday, December 2, 2009

Gajar Ka Halwa

Come winter and the one thing that pops in mind is off course nothing else than the carrot halwa, one of the few desserts loved by all.Though gajar halwa is a winter favourite but i like to make it throughout the year ,served warm with a scoop of vanilla ice-cream in summer and with a dollop of cream in the winter .I personally think that a sumptuous meal is always incomplete without desserts like kulfi,kheer and gajer halwa.My mother makes heavenly gajer ka halwa and i am sharing her recipe here .

What you will need :
  1. Carrots : 2 kg ( peel and cut top and bottoms off )
  2. Evaporated milk ( Rainbow ) : 2 cans
  3. Sugar : 3 cups ( or up to taste)
  4. Milk powder : 6 cups
  5. unsweetened khoya : 1 cup
  6. oil : 2 cups 
  7. kewra Essence : 2 drops ( omit if you don't like the smell)
  8. pistachio and almonds :  5 tbsp each ( chopped )
How to :
  • Grate the peeled carrots.Put the grated carrots and evaporated milk in a nonstick pan and let cook on gentle heat till the milk evaporates and the carrots become soft and mushy.
  • Add in the sugar, milk powder , kewra essence and oil and cook stirring constantly till the oil oozes out and the halwa starts to leave the side of the pan and no longer sticky.
  • Now add the unsweetened khoya chunks and mix gently .
  • Let the halwa cook on a very slow flame for about 10 minutes.
  • Mix in the chopped nuts .
  • Serve warm or cold.
Notes :
  1. For the smoothest and melt in the mouth halwa , the secret is continuous stirring.
  2. The halwa is best eaten fresh but because of high sugar and fat it freezes well too. You can freeze it up to a month . when needed defrost for an hour on counter top and then heat thoroughly in microwave before serving.
  3. You can omit unsweetened khoya if you don’t have it , but it gives a nice grainy or crunchy taste against the smoothness of the halwa.
  4. Use bright red Pakistani carrots that gives the halwa its unique jeweled colour.

Gajer Hlaw
Continue Reading >>

Wednesday, September 16, 2009

Fried Onions

Fried Onions


 cooking is an art … but when it comes to fried onions …. its a super art !!! You may have read or heard of frying onions till they are golden brown …. sounds easy ..beware its not .. i my self “perfected” this after burning and ruining lots of onions and countless failed attempts.. now that i know how to perfectly brown the onions i thought i should share this with all of the confused souls out like me … so here it goes:
  • Take 2 - 3 kilograms of onions ( onions tend to loose a lot of water and shrink while frying and since its very time consuming process..i prefer to fry a big batch and recommend you to do so).
  • peel the onions and and slice them ,now slicing the onions especially for frying is another art.The rule for for crisp fried onions is…. “ the thinner , the better “ but the secret is consistency ..whatever thickness or should i say thinness you prefer ..all of the sliced onions should be of the same thinness or thickness .... The reason is that when you fry the onions the thin ones will fry and get burnt while the thick ones will be still raw and pale white  .. and that's believe me a culinary disaster ….so make sure the sliced onions are wafer thin and of the same size ..you can achieve this by using slicer or any appliance that could do the slicing.
  • Now that the slicing has been done its time to fry the onions ..Take a large nonstick pan or any heavy bottom pan and add oil ( be generous with the oil , for crisp fried onions .. the onions should be fully submerged in oil)
  • Heat the oil and add all the onions at once … keep stirring and fry them on high heat till they turn translucent and soft.
  • Now reduce flame to low and continue frying them till they start to get a very pleasant reddish brown color or famously known as golden brown.Watch the onions like a hawk at this point and keep stirring all the time since they tend to burn or over fried very easily..and that would ruin whatever dish you are planning to make…
  • Take out the fried onions with a slotted spoon from the oil , spread them on a paper towel and let them cool .
  • Congratulations … You have mastered the fine art of frying the onions ..
Notes :
  • These fried onions can be used for biryani , qourma, mirchi ka salaan or wherever you need the crisp brown onions.
  • Since most of the salaans or curries require fried onion paste .. you can wet grind these fried onions to a paste . i usually freeze the grounded paste into cubes and use accordingly.
  • You can also freeze the whole fried onions as it is in zip lock bags and use it to garnish daal, haleem , biryani etc . for that just defrost the frozen fried onions for about 20 minutes or so.
  • Ladies again whenever you decide to fry onions .. fry them in a large quantity and freeze them .. believe me it will make cooking your favorite dish a breeze without compromising the taste.
  • Since the fried onions leave a brownish residue in the oil … filter the oil and use it as you normally do for everyday cooking .. its even better because this oil will add a nice aroma to your curry that comes from onions being fried in it.
Continue Reading >>

Tuesday, September 1, 2009

Khajour ka Halwa

This halwa is my Abbo Jee’s favorite because it combines two of his fav snacks : bhunay chanay and dates .
The art of making a smooth halwa is not a secret ,so for the smoothest halwa all you need is just“ Elbow Power”.Continuous stirring while cooking the halwa results in the silky texture that melts in your mouth .Apart from the almost killing stirring making halwa is a breeze.so the word of caution : do not try this at home unless you have extra arms to assist in stirring
This date halwa is very delicious and tasty so enjoy one or two squares at time unless you need extra energy ( which by the way you will be after stirring and stirring for hours )….
what you need :
  • Dates : 500 grams ( weigh after pitting them)
  • Milk ( fresh ) : one cup
  • Kewra Essence : 2 – 3 drops (optional)
  • Cardamom Powder : 1/2 teaspoon
  • Gram flour ( baysen ) : 2.5 cups
  • Sugar : 1/2 cup (optional)
  • Oil : 3/4 - 1 cup
  • Walnuts : 6 tbsp (chopped)
  • Almonds : 6 tbsp (chopped)
  • Pistachio : 6 tbsp (chopped)
How to do it :
  1. Add kewra essence and cardamom powder in the milk.
  2. Warm milk in a nonstick pan . to this add the pitted dates and cook till it becomes soft and mushy.
  3. Let this cool a bit and then blend it to a smooth paste and keep aside.
  4. In another nonstick pan , heat the oil .
  5. Add baysen and roast stirring continuously till baysen turns light brown and gives of a nutty aroma.
  6. To this roasted baysen add the blended dates paste and cook on medium flame for five minutes . Sugar test at this stage , add half cup sugar now if its not sweet enough for you.
  7. Turn the heat to low and cook the halwa continuously stirring till it starts to leave the sides of the pan , no longer sticky and you can see the oil oozing out of it.
  8. Add in half of the chopped dry fruits now and mix well.
  9. Turn off the heat .. stir few times to let the steam escape.
  10. Transfer the halwa to a lightly greased mould of your choice ( preferably a stainless steel thali ).Smooth it out with the back of a spoon .
  11. Let it stand for ten minutes then cut out the diamonds .Sprinkle the rest of the chopped nuts on them.
  12. Serve at room temperature or cold with a generous dollop of cream.
  13. Enjoy.
Notes :
  • You can use vanilla essence instead of Kewra.
  • Use whole cardamom instead of powdered if you don't like the taste.
  • Use 2 cans of Rainbow milk instead of fresh milk for more richer taste.
  • Do not let the halwa unattended even for a minute .. it burns pretty fast.
  • As i have said earlier for the smoothest halwa ..do not stop stirring for a second because you don't  want to end up with  burnt halwa.
Continue Reading >>

Sunday, August 23, 2009

Baigan Ka Bharta

14

What you will need:
  • Brinjal : 500 grams ( half kg )
  • onions : 2 medium ( chopped finely )
  • Tomato : 250 grams ( chopped finely)
  • Turmeric powder : 1/4 tsp
  • Red Chili powder : 1 tsp ( or up to taste )
  • Salt : 1 tsp ( or up to taste )
  • Tamarind pulp : 1 tbsp ( or up to taste )
  • Ginger + garlic paste : 1 tbsp
  • Green Bell pepper : 1 ( diced )
  • Spring Onions : 1/2 cup ( chopped finely )
  • Oil : 1/2 cup
  • Green Coriander : 2 tbsp ( chopped finely )
How to do it :
  1. Wash brinjals and fire roast them directly until they are slightly charred and become soft and mushy.
  2. Remove the skin and stem of brinjals .. and mash the pulp..keep aside.
  3. Heat oil add onions and fry till light golden brown.
  4. Add ginger garlic paste and fry a little.
  5. Add tomatoes along with all the spices.Let it cook until almost all the water evaporates .
  6. Now add brinjal and tamarind pulp and let it cook till oil starts to ooze out.
  7. Add spring onion and green pepper at this point.
  8. Close the lid and let it cook on slow flame till the pepper gets tender.
  9. Check seasonings , sprinkle with green coriander and serve with hot Nan or chapatti.
Notes :
  • Fire roasting will impart the BBQ flavor which makes this bharta extra tasty.
  • Instead of tamarind pulp you can add lemon juice .
  • To make the dish more colorful and appealing you can use red or yellow bell pepper instead of green.
  • Butter Nan or chapatti for more taste.

Baigan Bharta -2
Continue Reading >>

Friday, August 7, 2009

Chicken Shami Kabab

This recipe is given to my by friend Jamila Javaid .This is her mother’s recipe. I tasted these Kababs first time at her home.They were really good. I asked for the recipe and Jamila was kind enough to pass me the recipe.Thank You Jamila.. :)
These kababs are great as a snack on their own with chutney or dips of your choice. They also taste super good in a burger.Make the burger with all the other must have stuff ( mayo,lettuce,cucumber,tomato,cheese,onions and pickles) but replace the regular burger Pattie with this Shami tikkya. One extra yummy Desi burger is ready .Serve with chilled Pepsi,Tangy raita and crispy French fries…


11
What you will need:


  • Chicken : One 1200 gm ( skinned and cut into curry pieces)
  • Chana Daal : 1 cup – 250 gms ( wash the daal and soak it in sweet water for 3 hours)

A – Kabab Masala :

  • Onion : 2 medium ( peeled and quartered)
  • Garlic : 5 – 7 bulbs ( peeled)
  • Ginger : 2 inch piece ( peeled and quartered)

(Put these three ingredients in a blender and blend into a smooth paste.)

  • Red Chilies ( whole) : 5
  • Black Peppers ( whole) : ½ tsp
  • Clove ( whole) : ½ tsp
  • Cardamom black : 2 pieces
  • Cinnamon ( whole) : 2 small sticks
  • Salt : 2 tsp ( or up to taste)

B – Hara Masala :

  • Fresh Cilantro : 1 bunch
  • Fresh Mint : 1 bunch
  • Green chilies : 8 ( up to taste)
  • Onions : 3 medium ( peeled and quartered)

Put all the above in the chopper and chop finely. Keep aside.

C – Taste Enhancers:

  • Coriander powder : ½ tsp
  • Cardamom powder : ½ tsp
  • Garam Masala : 1 tsp
  • Tamarind pulp : 1 ½ tbsp ( you can use lemon juice too …up to taste)
  • Egg : 1 ( well beaten)

How you will make it:

  1. Put the Chicken and soaked Chana daal (with water it was soaked in) in a pan.
  2. Add all the ingredients of Kabab Masala – A into it.
  3. Add about 2 cups of sweet water into it and boil gently on a medium heat until the water evaporates. By this time the chicken and daal will be tender to form a mushy paste. If not then add ½ cup of water again and cook till both are done.
  4. Let the mixture cool enough to handle. Discard the whole Masala and debone the chicken.
  5. Grind this mixture into a smooth paste.
  6. Add Hara Masala – B into it and mix.
  7. Now add the Taste Enhancers – C and mix with your hands.
  8. Shape into Shami Tikkyas and Freeze them.
  9. When you want to fry them, take out from the freezer, dip in well beaten egg and shallow fry on medium heat till cooked through.
  10. Serve with dips of your choice. Enjoy.

9
Continue Reading >>

Wednesday, July 22, 2009

Semolina Cake

This cake is kind of a cross between the famous Arabic Baboosa and the humble Soojee Halwa…..Since this is the baked version …I personally prefer this one instead of basboosa and soojee halwa as its more healthy and figure friendly :)

What you will need:

  • Eggs : 4
  • oil : 1 cup
  • sugar : 1 cup
  • vanilla essence : 1 tsp
  • Nestle cream ( original ) : 2 tins
  • Coconut Powder : 1 cup
  • Semolina ( soojee ) : 1 cup
  • Milk Powder : 1 cup
  • Baking powder : 2 tsp
How to do it :

  1. Beat oil and eggs together,now add sugar and cream and beat till smooth.lastly add 1 tsp vanilla essence and blend in.
  2. To this smooth mixture add coconut powder , soojee , milk powder and baking powder one after another.
  3. Whisk in all these till you get a smooth and creamy mixture.
  4. Pour this into a baking pan and bake for about 35 - 40 minutes on 180 centigrade or till set.
  5. Take out from the oven ...let it cool for about 15 minutes.
  6. Take out from the pan.Cut diamonds and sprinkle almonds and pistachio.
  7. Serve warm or chilled..tastes equally good either way.
Notes:
  • You can use kewra essence instead of vanilla to give more authentic paki flavor.
  • Instead of baking pan u can bake this in aluminum foil tins available in the market for ease of use.
Continue Reading >>

Friday, July 10, 2009

Hari ( green ) Chatnee

7

  • Fresh Cilantro : 1 bunch
  • Fresh Mint : 1 bunch
  • Green Chillies : 5 ( up to taste )
  • Tomato : 2 medium ( quartered )
  • Tamarind Juice : 2 tablespoon ( up to taste )
  • Salt : 1 teaspoon ( up to taste )
How to do it :
  1. Clean and wash the cilantro.
  2. Pick the mint leaves.
  3. Remove stems from the chillies..
  4. Put all the above ingredients in the blender and blend to a smooth mixture.
  5. Adjust seasoning.
  6. The green chatnee is ready.
  7. Serve with snacks for extra tangy taste.
Notes :
  • This Chatnee will keep fresh for at least 5 days in the fridge, but since its super easy to make,i would suggest to make a small batch at a time because the fresh chatnee tastes quite mean :)

    10
Continue Reading >>

Thursday, July 9, 2009

Dahi Ki Chatnee

6

What you will need :
  • Dahi ( yogurt) : 2 cups
  • Fresh Cilantro : 1 bunch ( cleaned and washed)
  • Fresh Mint : 1 bunch ( break leaves from the stem)
  • Lemon Juice : 2 tablespoon ( up to taste)
  • Whole Red Chilies : 6 ( up to taste)
  • Fresh Garlic : 4 cloves ( up to taste)
  • Salt : 1 teaspoon ( up to taste)

How to do it :

  1. Place all the above ingredients in the blender.
  2. Blend to a nice slightly thick mixture .
  3. Adjust seasoning.
  4. Serve.
Notes :
  • This chutnee tastes supper with biryani , pulao and most of the salans.
  • Tastes excellent with pakoras , samosas , and grills.
  • Taste good with burgers and fries.
Continue Reading >>
Related Posts with Thumbnails
 

designer : anniebluesky ( Modified by | Sadia Naseeb ): www.bloggeruniversity.blogspot.com